 Skip to content
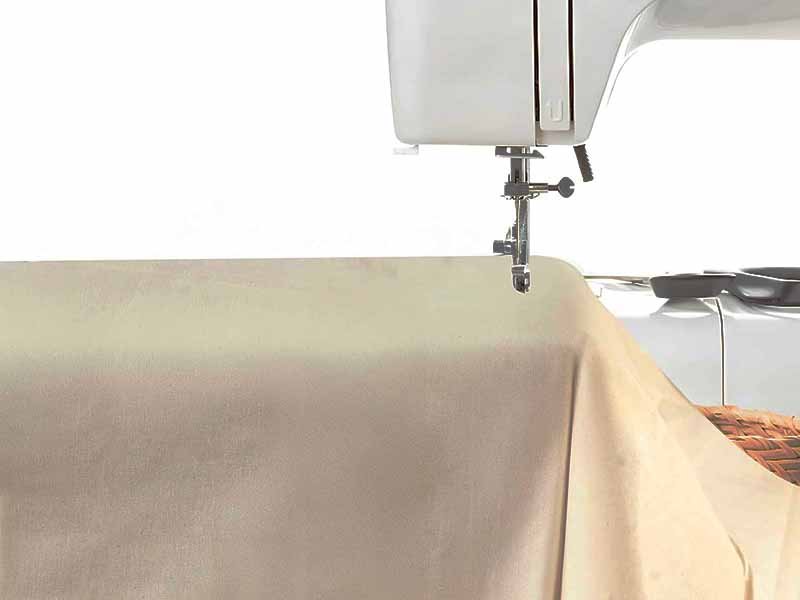
Canvas is often seen as a simple material because its surface looks plain and familiar. In actual product development, it is one of the fabrics that exposes manufacturing weakness the fastest. A canvas tote may look square and clean when it first comes off the sample table, but after loading 8 to 12 kilograms for daily use, problems begin to show very quickly if the cutting and sewing work was not done correctly. Handles twist, seams open, corners deform, and the body loses structure. In many cases, the problem is not the canvas itself. The problem starts much earlier, at the cutting table and sewing line.
Canvas cutting and sewing techniques are the practical methods used to cut thick canvas accurately, control fabric movement, sew stable seams, reinforce stress points, and keep finished products strong, neat, and consistent in bulk production. These techniques directly affect product shape, carrying strength, appearance, production efficiency, and long-term durability.
For customers developing canvas bags, pouches, aprons, tool rolls, storage products, or utility accessories, this topic matters because the same fabric can produce completely different results depending on the factory’s process control. At Lovrix, we have seen many cases where an attractive first sample failed in real use because the panel tolerance was loose, the stitch density was wrong, or the seam structure did not match the load point. Good canvas products are not built by fabric alone. They are built by process discipline.
What Are Canvas Cutting and Sewing Techniques Basics?

Canvas cutting and sewing techniques basics refer to the core production rules that determine whether a canvas product will hold its shape, carry weight safely, and maintain a clean appearance after repeated use. These basics are not theoretical concepts—they are practical controls used on the factory floor to manage fabric behavior, cutting accuracy, seam strength, and production consistency.
For customers developing canvas products, the “basics” are often where success or failure is decided. Many products fail not because of poor material choice, but because these fundamental steps were not executed properly. A well-structured canvas bag should pass three key conditions:
- Maintain shape after loading (no twisting or leaning)
- Withstand repeated use without seam failure
- Keep a clean and balanced appearance
To achieve this, factories must control four essential variables:
| Core Factor | What It Controls | Impact on Final Product |
|---|---|---|
| Fabric preparation | Stability and consistency | Prevents shrinkage and distortion |
| Cutting accuracy | Panel alignment | Ensures clean assembly |
| Sewing structure | Strength and durability | Prevents seam failure |
| Reinforcement design | Load distribution | Extends product lifespan |
Even small deviations in these areas can create visible defects or functional problems in bulk production.
What Is Canvas in Cutting and Sewing Techniques?
In production, canvas is treated as a structural material rather than a soft fabric. Its behavior is defined by density, thickness, and low elasticity, which means it does not easily “adjust” during sewing.
Canvas is commonly categorized by weight:
| Canvas Type | Weight Range | Common Use |
|---|---|---|
| Light canvas | 8–10 oz (270–340 GSM) | Drawstring bags, liners |
| Medium canvas | 10–16 oz (340–540 GSM) | Tote bags, aprons |
| Heavy canvas | 16–24 oz (540–800 GSM) | Tool bags, storage products |
From a technical standpoint, canvas presents three key characteristics:
- It resists stretching, so cutting errors cannot be corrected during sewing
- It builds thickness quickly when layered
- It creates higher resistance during needle penetration
Because of this, every step must be more controlled compared to lighter fabrics.
For example, when sewing a 12 oz canvas tote with webbing handles, the handle attachment area may reach 6–8 layers of material thickness. If the needle and machine setup are not matched correctly, this area becomes the first failure point.
Customers should understand that canvas quality alone does not guarantee performance. The way the material is handled during production is equally important.
Why Are Canvas Cutting and Sewing Techniques Important?
These techniques directly affect product performance, especially for load-bearing items.
In real usage scenarios:
- A daily tote bag may carry 5–10 kg
- A grocery or utility bag may carry 10–15 kg
- A tool or storage bag may carry 15–25 kg
If the cutting and sewing are not done properly, failure typically occurs at:
- Handle connection points
- Side seams
- Bottom corners
- Zipper ends
Production data shows that a poorly constructed seam can reduce product lifespan by more than half, even when using high-quality canvas.
The impact of proper techniques can be clearly seen:
| Area | Poor Technique Result | Proper Technique Result |
|---|---|---|
| Panel alignment | Twisted or uneven shape | Clean, balanced structure |
| Seam strength | Breaks under load | Long-term durability |
| Appearance | Crooked stitching | Straight, professional finish |
| Production efficiency | High rework rate | Stable output |
For customers, this translates into:
- Fewer returns and complaints
- Better product reviews
- Stronger brand perception
This is especially important for e-commerce brands where product quality directly affects ratings and repeat purchases.
What Makes Canvas Cutting and Sewing Techniques Challenging?
Canvas production becomes challenging because multiple technical factors interact at the same time.
The first challenge is thickness variation. A single panel may be easy to sew, but once folded, layered, or combined with accessories like webbing, zippers, or binding, the thickness increases rapidly. This creates uneven resistance during sewing.
The second challenge is feeding control. Canvas does not glide smoothly under the machine foot like lightweight fabric. This can cause:
- Stitch misalignment
- Fabric shifting
- Uneven seam lines
The third challenge is cutting precision under bulk conditions. When cutting 10–30 layers at once, maintaining consistent tolerance becomes more difficult. Even a small blade deviation can affect multiple pieces.
The fourth challenge is heat and friction during sewing. Thick canvas creates resistance, which generates heat. If not controlled, this can:
- Weaken thread strength
- Cause needle damage
- Affect seam durability
Below is a breakdown of common challenges and their impact:
| Challenge | What Happens | Result |
|---|---|---|
| Multi-layer thickness | Increased resistance | Needle breakage, weak seams |
| Fabric shifting | Uneven feeding | Crooked stitching |
| Cutting deviation | Panel mismatch | Assembly difficulty |
| Heat buildup | Thread weakening | Reduced durability |
Another important point is that canvas products must balance strength and appearance. Over-reinforcing a product can make it bulky and difficult to handle, while under-reinforcing leads to failure under load.
For customers, this means that a factory must not only know how to sew canvas, but also how to balance:
- Strength vs flexibility
- Durability vs appearance
- Efficiency vs precision
At Lovrix, these challenges are addressed through controlled processes, proper equipment selection, and experience gained from handling a wide range of canvas products across different industries.
What Tools Are Used in Canvas Cutting and Sewing Techniques?

Canvas cutting and sewing techniques depend heavily on proper tools because thick fabric requires more control, more force, and more stability than ordinary textile production. The right tools improve accuracy, seam quality, and production speed, while the wrong tools create waste, delay, and weak construction.
Which Tools Improve Canvas Cutting and Sewing Techniques?
The first stage of good canvas production begins at the cutting table. Many people underestimate this step because cutting looks simple from the outside. In reality, cutting quality controls the fit of the entire product.
For sample development or very small batches, manual tools may still be used, including industrial shears, rotary cutters, steel rulers, pattern templates, and chalk or heat-erasable markers. These tools work when the operator is skilled and the quantity is low. However, once the project moves into larger production, manual cutting alone usually cannot provide the consistency required for stable bulk quality.
Factories handling canvas products typically use one or more of the following cutting systems:
| Tool or Equipment | Best Use | Main Advantage | Main Limitation |
|---|---|---|---|
| Heavy-duty shears | Sample room, small panel adjustment | Flexible and low cost | Slow and operator-dependent |
| Rotary cutter | Straight lines, long panels | Smooth edge, fast for small stacks | Less effective on very thick stacks |
| Straight knife cutter | Bulk layered cutting | High speed and good efficiency | Needs skilled operator |
| Band knife cutter | Curves and detailed shapes | Better control on shaped panels | More setup and training needed |
| Die cutting | Repeated fixed shapes | High consistency and fast output | Tooling cost required |
| CNC cutting | Precision production | Stable tolerance and repeatability | Higher equipment investment |
For customers ordering repeated SKUs such as canvas totes, pouches, aprons, or storage organizers, the right cutting system can make a visible difference in consistency. A product line with fixed dimensions benefits from die cutting or controlled machine cutting because tolerance can be tightened and labor variation reduced.
At Lovrix, canvas projects are usually reviewed by style structure, fabric weight, order volume, and shape complexity before the cutting method is selected. That matters because the “best” tool is not universal. A 12 oz cotton canvas tote with simple square panels does not need the same approach as a waxed canvas utility bag with shaped flaps and multilayer pockets.
Customers also care about material utilization. Better cutting methods improve marker efficiency and reduce waste. Even a 2% to 4% improvement in material usage can matter when the order volume is large or when the canvas includes special dyeing, washing, waxing, or printing treatment.
What Needles Fit Canvas Cutting and Sewing Techniques?
Needle choice is one of the most overlooked decisions in canvas product development. Customers often focus on thread color and visible stitch lines, but needle selection has a direct effect on seam quality, machine stability, surface damage, and product durability.
For canvas, needle size must match three things at the same time: fabric weight, total layer thickness, and thread size. If the needle is too small, it struggles to penetrate dense layers, causing skipped stitches, thread shredding, or needle breakage. If it is too large, it leaves overly visible holes and may weaken coated or waxed surfaces.
In many canvas applications, needle sizes around 16 to 22 are commonly used, but the real decision depends on the actual stack. A two-layer 10 oz canvas pouch is very different from a four-layer 16 oz canvas tote with webbing reinforcement.
The table below offers a practical reference:
| Product Type | Common Fabric Range | Layer Situation | Needle Direction |
|---|---|---|---|
| Simple pouch | 8–12 oz canvas | 2–3 layers | Medium heavy needle |
| Tote bag body seam | 10–16 oz canvas | 3–5 layers | Heavy-duty needle |
| Handle base area | 12–24 oz canvas plus webbing | 5–8 layers | Stronger heavy needle |
| Waxed canvas panel | 10–18 oz waxed fabric | 2–4 layers | Needle selected to reduce visible damage |
| Tool bag corner | 16–24 oz canvas plus reinforcement | 6–10 layers | High-penetration setup |
Needle point type matters as well. For woven canvas, the goal is usually controlled penetration without excessive yarn breakage. The wrong point can create rough entry holes or disturb the weave. On waxed or coated canvas, needle marks are even more visible because the surface does not recover the same way plain untreated canvas does.
From a customer standpoint, correct needle setup brings four visible benefits. The seam line looks cleaner. Stitch tension stays more balanced. The fabric surface suffers less damage. The production line runs more smoothly with fewer stops and less breakage.
At Lovrix, needle selection is not separated from thread and seam design. The sample room tests the full sewing combination because good canvas sewing is always a system, not a single-material decision.
What Machines Support Canvas Cutting and Sewing Techniques?
Canvas cannot be sewn well on the wrong machine, even if the operator is experienced. Machine capability sets the ceiling for what the product can achieve in consistency, speed, and seam quality.
For light canvas samples, a strong flatbed machine may sometimes be enough. For structured canvas goods, especially bags and utility items, factories usually rely on industrial equipment designed for heavy material handling and multilayer penetration.
The most commonly used machine categories include:
| Machine Type | Function in Canvas Production | Why It Matters |
|---|---|---|
| Flatbed lockstitch machine | General seam construction | Basic line sewing for many panels |
| Walking foot machine | Feeds thick layers evenly | Reduces shifting and seam crawling |
| Cylinder bed machine | Sewing tubular or bag-shaped areas | Better access for assembled bag parts |
| Double-needle machine | Parallel decorative or structural stitch lines | Improves appearance and seam balance |
| Bar tack machine | Reinforcement at handles and stress points | Critical for load-bearing durability |
| Post bed machine | Tight or shaped sections | Useful for detailed assembly work |
Among these, walking foot and cylinder bed machines are especially important for canvas bags. A walking foot machine helps move the upper and lower layers more evenly, which is valuable when sewing thick seams, folded hems, and webbing-attached sections. A cylinder bed machine allows better control in three-dimensional products after partial assembly.
Machine setting is just as important as machine type. Presser foot pressure, stitch length, upper and lower tension, motor torque, and speed must all be adjusted based on the canvas style. Many canvas products sew more reliably at controlled speeds than at maximum line speed. Higher speed may look efficient, but it often increases heat, thread wear, vibration, and seam inconsistency in thick stack areas.
For customers, proper machine matching leads to very practical benefits. The seams stay straighter. The corners look cleaner. The handle reinforcement becomes more reliable. Bulk production becomes more repeatable from the first unit to the last.
A good factory does not simply say it can sew canvas. It should be able to explain how it sews different canvas structures, what machine combination is used, and how it handles high-bulk zones without damaging the material. This is especially important in custom private label and OEM development, where the product must look good on arrival and still perform well after real daily use.
At Lovrix, canvas product engineering is built around use case. A promotional tote, a waxed canvas work apron, a heavy storage organizer, and a utility tool bag may all use canvas, but they should not use the same sewing setup. Matching the machine system to the product structure is one of the reasons why some factories can scale quality and others cannot.
How Do You Apply Canvas Cutting and Sewing Techniques?
Applying canvas cutting and sewing techniques means turning fabric into stable, repeatable products through controlled preparation, accurate cutting, and structured sewing. The key is not just doing each step correctly, but ensuring every step connects smoothly so the final product keeps its shape, strength, and appearance across bulk production.
How to Prepare for Canvas Cutting and Sewing Techniques?
Preparation is where many production problems can be prevented before they even appear. Canvas is sensitive to handling conditions, especially cotton-based and treated fabrics.
The first step is fabric inspection. Every roll of canvas should be checked for:
- Surface defects (oil marks, weaving irregularities)
- Color consistency across batches
- Coating uniformity (for waxed or PU-coated canvas)
- Fabric weight deviation (±3–5% tolerance is common)
The second step is fabric relaxation. Canvas, especially tightly rolled fabric, may carry internal tension. If cutting begins immediately after unpacking, panels may shrink or distort later. In most factories, canvas is laid flat for 12–24 hours before cutting to stabilize dimensions.
The third step is marker planning. This determines how patterns are arranged on the fabric to reduce waste and maintain direction consistency. For products like tote bags with visible grain direction, incorrect marker layout can affect final appearance.
Below is a practical preparation checklist used in controlled production:
| Preparation Step | Why It Matters | Risk If Skipped |
|---|---|---|
| Fabric inspection | Detect defects early | Defects appear in finished goods |
| Fabric relaxation | Stabilizes size | Panel shrinkage or distortion |
| Marker planning | Reduces waste | Higher material cost |
| Grain alignment | Maintains visual consistency | Twisted or uneven look |
| Pre-cut test | Confirms settings | Cutting errors in bulk |
For customers, proper preparation ensures that the first sample and bulk production behave the same way. Without this step, it is common to see samples look fine but bulk orders show shape inconsistency.
How to Cut Fabric in Canvas Cutting and Sewing Techniques?
Cutting is not just about separating fabric into pieces. It defines the precision of the entire product. In canvas production, cutting tolerance is usually controlled within ±1–2 mm, especially for structured products.
There are three key methods used depending on order size and product complexity:
- Single-layer cutting (sample stage)
- Used for development and small runs
- Allows detailed adjustment and pattern correction
- Slower but flexible
- Multi-layer cutting (bulk production)
- 10–30 layers stacked together
- Increases efficiency
- Requires sharp blades and stable pressure
- Die cutting (high-volume repeat styles)
- Steel molds used for fixed shapes
- High consistency across thousands of units
- Ideal for tote bags, simple pouches
Cutting accuracy directly affects sewing alignment. Even a small deviation can lead to:
- Uneven seams
- Twisted body panels
- Difficulty in matching corners
The following table shows typical tolerance expectations:
| Product Type | Cutting Tolerance | Complexity Level |
|---|---|---|
| Simple tote bag | ±2 mm | Low |
| Zipper pouch | ±1.5 mm | Medium |
| Structured bag | ±1 mm | High |
| Multi-pocket utility bag | ±1 mm or tighter | Very high |
Another important factor is edge condition. Clean cutting reduces fraying and makes sewing easier. For coated or waxed canvas, dull blades can drag the surface and damage the finish.
At Lovrix, cutting lines are monitored regularly, and blades are replaced based on cutting cycles rather than waiting for visible defects. This helps maintain consistent edge quality across production batches.
How to Sew Strong Seams in Canvas Cutting and Sewing Techniques?
Sewing is where durability is built. A canvas product can only perform as well as its seam structure allows.
The most important factors in seam strength are:
- Stitch density (stitches per inch)
- Thread type and thickness
- Seam type (plain seam, flat-felled seam, bound seam)
- Reinforcement at stress points
For most canvas products, stitch density ranges between 6–10 stitches per inch (SPI) depending on fabric weight and seam type. Too few stitches reduce strength. Too many stitches can weaken fabric by perforation.
Below is a reference for seam application:
| Area | Recommended Technique | Reason |
|---|---|---|
| Side seams | Lockstitch + backstitch | Basic strength |
| Handle base | Box stitch + cross (X) | Load distribution |
| Bottom panel | Double stitching | Extra durability |
| Zipper area | Reinforced stitching | Prevent tearing |
| Corners | Bartack or reinforcement patch | Stress resistance |
Thread selection also plays a major role. Polyester thread is widely used because it resists abrasion and maintains strength over time. Cotton thread may look natural but tends to wear faster under load.
Heat control is another factor. Sewing thick canvas generates friction. If the machine runs too fast, thread can weaken due to heat, especially in long seams.
For customers, the difference between a standard seam and a reinforced seam can determine whether a product lasts months or years. This is especially important for:
- Grocery totes
- Tool bags
- Outdoor gear
- Storage products
At Lovrix, seam structures are selected based on real use scenarios. A light promotional bag and a heavy-duty utility bag will not use the same reinforcement logic, even if they look similar at first glance.
Which Methods Improve Canvas Cutting and Sewing Techniques?

Improving canvas cutting and sewing techniques is about increasing consistency, durability, and production efficiency at the same time. This involves selecting the right stitch types, reinforcing key areas, and managing thick material layers effectively.
Which Stitch Types Work in Canvas Cutting and Sewing Techniques?
Different stitch types serve different functions in canvas products. Choosing the correct stitch improves both strength and appearance.
The most commonly used stitches include:
| Stitch Type | Application | Benefit |
|---|---|---|
| Lockstitch | General seams | Balanced strength |
| Double stitch | Structural seams | Extra durability |
| Chain stitch | Long seams | Faster production |
| Bartack | Stress points | High reinforcement |
| Zigzag stitch | Edge finishing | Prevents fraying |
For example, a tote bag handle should not rely on a single straight stitch. It should use a box stitch combined with bartack reinforcement to distribute load.
In high-end products, decorative stitching is also used to enhance appearance while maintaining function.
How to Reinforce Canvas Cutting and Sewing Techniques?
Reinforcement is critical in areas that carry weight or experience repeated stress.
Common reinforcement methods include:
- Adding extra fabric layers
- Using webbing inside seams
- Applying bartack stitches
- Using rivets (in some designs)
The handle base is the most critical area in most canvas bags. Without proper reinforcement, this is usually the first point of failure.
A typical reinforcement structure:
| Component | Function |
|---|---|
| Outer canvas | Main body |
| Inner reinforcement patch | Distributes load |
| Webbing handle | Carries weight |
| Bartack stitching | Locks structure |
In testing, reinforced seams can handle 2–3 times more load compared to non-reinforced seams.
For customers, reinforcement is not always visible, but it defines product reliability. This is especially important for brands selling on platforms where customer reviews directly impact sales.
How to Handle Thick Layers in Canvas Cutting and Sewing Techniques?
Handling thick layers is one of the most technical parts of canvas production.
Problems that often occur include:
- Needle breakage
- Skipped stitches
- Uneven feeding
- Bulky seams
To solve these issues, factories apply several techniques:
- Reducing seam allowance thickness in hidden areas
- Using walking foot machines to stabilize feeding
- Adjusting stitch length for thicker sections
- Slowing machine speed at high-bulk points
Below is a comparison of poor vs optimized handling:
| Situation | Poor Handling Result | Optimized Handling Result |
|---|---|---|
| Thick corner seam | Bulky, hard to sew | Smooth transition |
| Handle attachment | Uneven stitches | Clean reinforcement |
| Multi-layer bottom | Weak seam | Strong and stable base |
Another advanced method is step sewing, where operators adjust speed and pressure manually when approaching thick sections. This reduces machine stress and improves stitch quality.
At Lovrix, operators are trained to recognize thickness transitions and adjust techniques accordingly. This is especially important for complex products like tool bags or multi-pocket organizers.
How Do Factories Optimize Canvas Cutting and Sewing Techniques?

Factories optimize canvas cutting and sewing techniques by controlling every stage from material planning to final assembly. The goal is not only to produce faster, but to maintain consistent quality across hundreds or thousands of units while reducing waste, rework, and production risk.
How Do Factories Improve Efficiency in Canvas Cutting and Sewing Techniques?
Efficiency in canvas production is built through system control rather than speed alone. Many inexperienced factories try to increase output by running machines faster, but this often leads to unstable stitching, higher defect rates, and more rework.
Professional factories focus on three areas:
- Process standardization
- Equipment matching
- Workflow optimization
The production line is usually divided into specialized steps such as cutting, panel preparation, assembly sewing, reinforcement, trimming, and finishing. Each step has defined quality checkpoints.
A simplified efficiency comparison:
| Factor | Uncontrolled Production | Optimized Production |
|---|---|---|
| Cutting accuracy | Inconsistent panels | Stable tolerance within ±1–2 mm |
| Sewing speed | Fast but unstable | Controlled speed with consistent quality |
| Defect rate | 8%–15% | 2%–5% |
| Rework frequency | High | Low |
| Production lead time | Unpredictable | Stable and repeatable |
Another key improvement method is modular sewing. Instead of assembling the whole product in one flow, parts like handles, pockets, and panels are prepared separately and then combined. This reduces bottlenecks and improves consistency.
At Lovrix, production lines are organized based on product complexity. Simple tote bags follow a streamlined line, while multi-pocket or structured bags use staged assembly. This approach helps maintain both efficiency and quality without sacrificing one for the other.
What Quality Control Is Used in Canvas Cutting and Sewing Techniques?
Quality control is not a single inspection step at the end. It is a continuous process throughout production.
For canvas products, quality control typically covers three stages:
- Pre-production control
- Material verification (color, weight, coating)
- Sample confirmation
- Process alignment
- In-line inspection
- Cutting accuracy checks
- Stitch consistency monitoring
- Reinforcement verification
- Final inspection
- Appearance check
- Function test (load, zipper, handle strength)
- Packing inspection
Below is a typical quality checklist used for canvas bags:
| Inspection Item | Standard Requirement |
|---|---|
| Panel size tolerance | Within ±1–2 mm |
| Stitch density | Consistent across seams |
| Thread tension | No loose or tight stitching |
| Reinforcement points | Correct placement and secure |
| Surface condition | No stains, scratches, or defects |
| Function test | Handles and seams hold expected load |
Load testing is especially important. For example:
- Light canvas tote → tested at 5–8 kg load
- Medium-duty bag → tested at 10–15 kg load
- Heavy-duty tool bag → tested at 20 kg or more
Products that fail testing are either repaired or rejected before shipment.
For customers, strong quality control means fewer complaints, fewer returns, and better long-term brand trust.
How Does Lovrix Optimize Canvas Cutting and Sewing Techniques?
Lovrix improves canvas production by integrating fabric development, webbing production, and bag manufacturing into one system. This reduces communication gaps and allows better control over both materials and processes.
Key advantages include:
- Material consistency Canvas, webbing, and accessories are controlled within the same supply system, reducing mismatch issues.
- Process customization Each product is evaluated based on use case. A fashion tote, a storage organizer, and a tool bag are treated differently in terms of cutting tolerance, seam structure, and reinforcement.
- Sampling speed and accuracy Standard samples are completed in 5–7 days, allowing faster development cycles.
- Low MOQ flexibility Starting from around 50 pcs, suitable for small brands and test orders.
- Production stability With over 18 years of experience, processes are standardized to reduce variation between batches.
A simple comparison from real production scenarios:
| Aspect | Generic Factory | Lovrix Approach |
|---|---|---|
| Material sourcing | Multiple suppliers | Integrated system |
| Process control | Basic | Structured and monitored |
| Sampling accuracy | Variable | High consistency |
| Customization | Limited | Flexible and detailed |
| Quality stability | Medium | High |
For customers, this means fewer adjustments, clearer communication, and more predictable results from sample to bulk production.
What Common Mistakes Happen in Canvas Cutting and Sewing Techniques?
Common mistakes in canvas cutting and sewing techniques often come from underestimating the material. These mistakes can lead to product defects, reduced durability, and higher production costs.
What Cutting Mistakes Affect Canvas Cutting and Sewing Techniques?
Cutting mistakes are often hidden at first but become obvious after sewing.
Common issues include:
- Inaccurate pattern alignment
- Dull cutting tools causing rough edges
- Ignoring fabric grain direction
- Cutting too many layers without proper control
These mistakes lead to:
- Twisted product shapes
- Difficult assembly
- Visible misalignment
A small error in cutting can multiply during sewing, especially in multi-panel designs.
What Sewing Errors Reduce Canvas Cutting and Sewing Techniques Quality?
Sewing errors are the most visible problems in finished products.
Typical issues include:
- Incorrect stitch density
- Weak backstitching
- Uneven seam lines
- Poor thread selection
These errors often result in:
- Seams breaking under load
- Poor product appearance
- Customer complaints
For example, using low-quality thread in a handle seam can reduce load capacity significantly, even if the fabric itself is strong.
How Can These Canvas Cutting and Sewing Techniques Problems Be Avoided?
Avoiding these problems requires a combination of process control and experience.
Key solutions include:
- Using proper cutting equipment and maintaining blade sharpness
- Setting clear tolerance standards
- Matching needle, thread, and machine settings to fabric thickness
- Reinforcing all stress points based on real usage
- Conducting in-line inspections during production
A practical prevention framework:
| Problem Area | Solution |
|---|---|
| Cutting inaccuracy | Standardized cutting templates |
| Weak seams | Correct stitch density and reinforcement |
| Fabric damage | Proper needle and machine setup |
| Inconsistent quality | In-line quality checks |
For customers, choosing a factory that understands these details reduces risk significantly.
Work With Lovrix to Build Your Custom Canvas Products
Canvas products may look simple, but the real difference comes from how they are made. Cutting precision, seam structure, reinforcement methods, and production control all determine whether a product performs well in real use.
Lovrix combines over 18 years of experience in fabric development, webbing production, and bag manufacturing to support brands and businesses in creating reliable canvas products.
Whether you are developing:
- Canvas tote bags
- Tool bags
- Storage organizers
- Aprons or utility products
- Custom private label collections
Lovrix can support you.
If you already have a design, a reference sample, or even just an idea, you can contact Lovrix to discuss your project. The right cutting and sewing techniques start from the right manufacturing partner.


